
From Intermediate to Advanced — 5 Wildlife Photography Tips
Elevating your work as a wildlife photographer could very well be through fostering a more stringent attention to detail, and critical eye. I hope the following will be helpful and can encourage and inform your future pursuit…
1. Be Very Intentional with light angle
There’s a reason why this is the first topic on this list…
I’ve long since believed that being deliberate with light angle, and observing with scrutiny the ways in which light interacts with your subject — particularly its eyes — is of utmost importance to the overall success of a wildlife image. If you’ve ever joined me on a workshop, you’ve probably experienced me talking at length about this, and making recommendations about shifting one’s position a seemingly trivial amount. Undoubtedly, one of the main things that separates intermediate-level photographers from professionals is a keen attention to detail regarding this. We’re rarely granted multiple chances with our often skittish subjects, so this is one of many reasons I believe it’s very important to form some preconception of what you want your image to look like. This will help you strategize your approach, and even help inform the choices you make about gear.

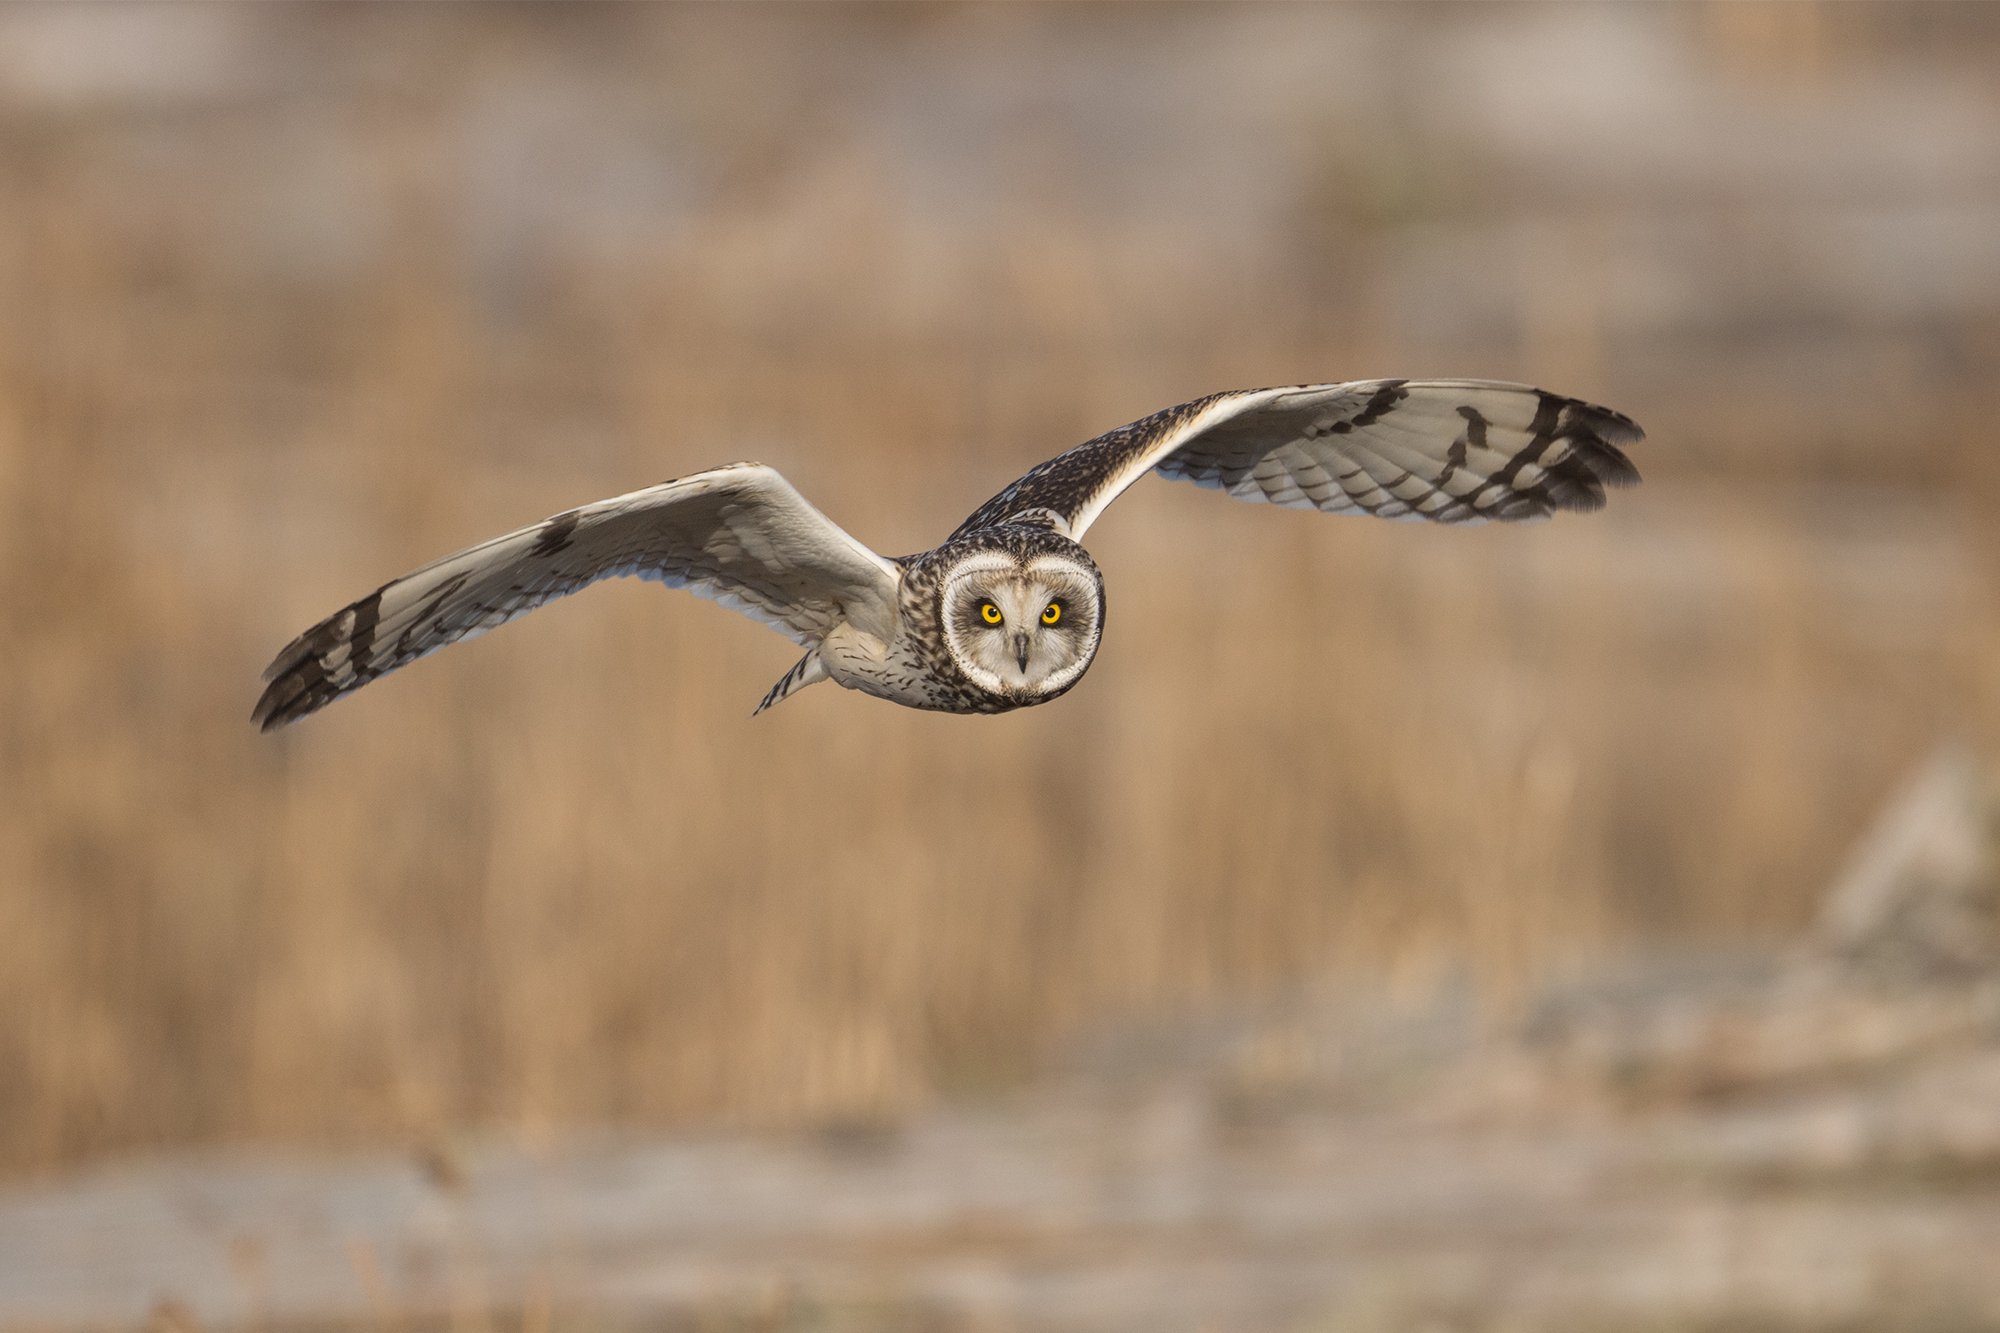
Short-eared Owl, Winter Birds of Vancouver Photo Workshop, British Columbia, Canada
Canon R5 | Canon 500mm f/4 IS with 2x Teleconverter | 1/500th | f/10 | ISO 640
When shooting in direct sunlight with owls, I find it particularly critical to pay very careful attention to light angle. In this case, it was important to me that this Short-eared Owl had symmetrical catchlights in both eyes, as well as a relaxed expression. Sometimes in such conditions, owls can take on something of a “deer in the headlights” look, even when they aren’t stressed. Additionally, being slightly off light angle can lead to some weird asymmetrical shadows on and around the eyes. To avoid this, after I aligned my shadow precisely with the bird, I waited for it to look slightly below my line of sight. This took the edge off by positioning the catchlights higher up, as not to obscure the owl’s pupils. These might all sound like inconsequential details for what’s in reality a fairly basic portrait of an owl sitting perfectly still, but what I will say, is that in situations like this, even the smallest of details matter. Acknowledging and putting this into practice is one of the most important mindset shifts that separates intermediate photographers and professionals.
Perfect front-lit alignment just happened to coincide with a nice gap in the rushes beyond, as well as a pleasing angle of the bird’s pose. This is attributable to nothing but luck, and isn’t often the case — something that makes shooting pleasing images in direct sunlight very difficult at times.

In the case of these flight images, the light angle differs by less than 45°. Unsightly shadows on the owl’s face, and a missing catchlight gives the first image an unpolished, “snapshot” feel. Compare it to the second image, which to my eye, appears far more intentional and refined, thanks to perfect sun alignment. Keeping the sun at your back with your shadow pointing directly at your subject is treated as gospel by many photographers. As a result, it’s become something of a ridiculed trope, with those who turn their noses up insisting front-lighting lacks creativity or artistry. While I will say that blindly adhering to any “rules” is a sure-fire way to stagnate growth with any artistic pursuit, looking at the images above, it’s clear why certain guidelines exist. Side-lighting and back-lighting can both produce wonderful results, but just like anything else, there’s a time and a place, they require careful attention to detail, and they shouldn’t be thought of as inherently “better” for all situations.

Common Loon, Ultimate Loons Photo Workshop, British Columbia Interior, Canada
Canon 5D Mark III | Canon 400mm f/5.6 | 1/1000th | f/6.3 | ISO 320
While certainly more challenging to pull off successfully, side-lighting can produce some beautiful results, often with far more drama and three-dimensionality than front-lit images. By carefully positioning our boat, we isolated this loon against the dark reflections of a shaded shoreline, with the light glancing it obliquely from behind. Being such an important part of the appearance of these birds, and the image itself, it was important to me to still retain a catchlight in the amazing red eye. Additionally, I waited for the head to angle just enough towards me as to capture the light reflecting off the bill.
Your movement relative to the subject, and the subject’s movement relative to the light source will make a huge difference in the details of a side-lit image. Just a few degrees can make or break the intended look you’re going for, so it’s extra important to pay careful attention both in the field, and during the culling process, to ensure you capture the decisive moment.
2. TAkE RISKS WITH Bold Settings
Outside of situations with moderate lighting and fairly static subjects, I would contend that there’s a significant correlation between middle-of-the-road settings and middle-of-the-road photographs. Consider the following…
Let’s say you’ve become comfortable with a combination of settings, and you typically work within fairly close range of this whenever you go out to shoot. Overall, there isn’t necessarily anything wrong with this approach, as there’s something to be said for sticking with whatever is giving you consistently decent results. After all, when considering our inability to communicate with our generally wary subjects, coupled with how ephemeral the moments we attempt to capture are, the odds of success are already stacked against us — perhaps more than any other genre of photography.
However… when confronted with the most dynamic moments, dramatic conditions, and peak wildlife activity in low light, average settings will very often produce average results. While consistency is important in certain situations, what’s perhaps more important is being bold with your settings, and sometimes taking risks. Like any other form of art, excellence in wildlife photography is about taking big swings. Becoming comfortable with the idea of missed opportunities is hugely important. The pursuit of 10/10 images goes hand-in-hand with a high likelihood of jeopardizing guaranteed 7/10 images. Shifting one’s mindset to accept this as a necessary part of the process will, in time, be met with success.

Northern Saw-whet Owl, Lower Mainland,
British Columbia, Canada
Canon R5 | Canon 500mm f/4 IS with 1.4x Teleconverter | 0.8 sec | f/5.6 | ISO 12,800
Many of my favourite photographs have been made long after conventional wisdom (espoused by many photographers — amateurs and professionals alike) would indicate that “the light was done”. This Northern Saw-whet Owl image, taken 25 minutes after sunset on an overcast evening, is no exception. Understanding a few things here was critical…
1. The habits of the bird
My previous experiences with small owls led me to believe that, despite the extremely low light, there was still a reasonable chance of making good images in this situation. Though their movement does make things challenging, if not downright impossible much of the time, there will often be moments where the bird remains entirely still, allowing surprisingly slow shutter speeds to render sharp results.
2. The capabilities / limitations of my gear and modern noise reduction
By gambling with a very slow (by bird photography standards) shutter speed, I was able to gather enough light to keep my exposure sufficiently bright, such that even an extremely high ISO value of 12,800 would produce a satisfactory file. Certainly much cleaner than an underexposed image taken at a faster or “safer” shutter speed. While it’s true that far from every exposure in this sequence is tack sharp, a few are, and to me, that’s what counts.
Get to know your gear; particularly your threshold for unacceptable levels of noise and the typical corresponding ISO value. This allows you to understand how to best take advantage of rare moments such as this, where you have no choice but to push your luck.

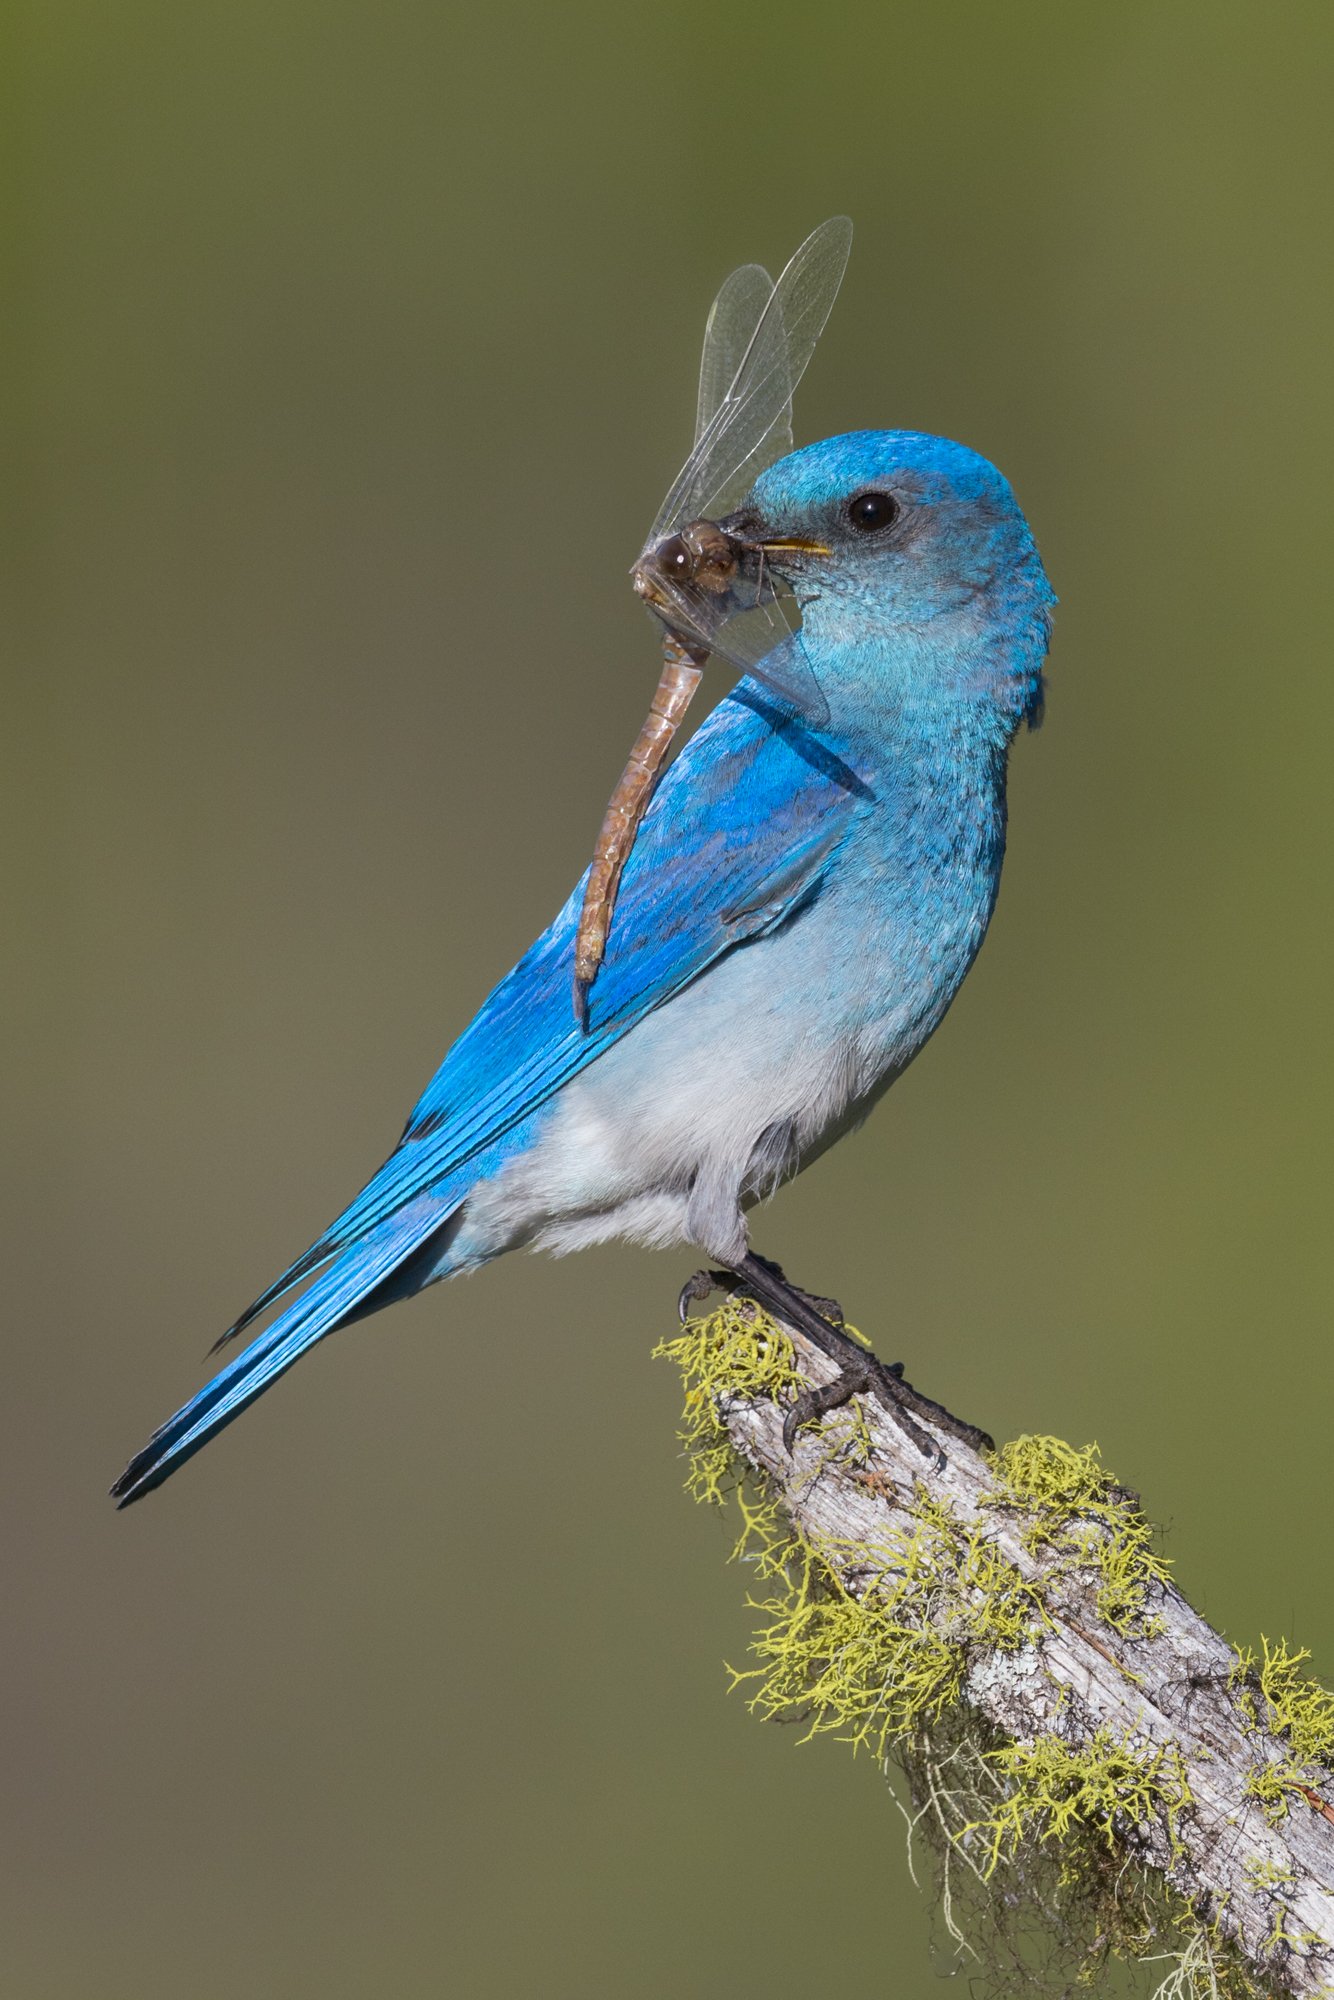
Violet-green Swallow, Okanagan Valley, British Columbia, Canada
Canon R5 | Canon 500mm f/4 IS with 1.4x Teleconverter | 1/5000th | f/5.6 | ISO 1600
Contrary to the previous image where a momentarily static subject allowed me to gamble with a very slow shutter speed in extremely low light, having success in this situation was entirely contingent upon making use of an exceedingly fast shutter speed.
This example image brings about an interesting discussion point on how we need to make informed compromises when choosing our manual settings. You simply can’t have it all, so it’s about determining which compromise will be least detrimental to the overall image in the end.
My rationale for the decided upon settings above were…
When compared with using a more “average” 1/2500th sec for example, the extreme shutter speed of 1/5000th sec would result in far more critically sharp images of these incredibly fast and erratic birds. Even though the shutter speed is twice as fast, and therefore necessitates twice the ISO value, the difference in the resulting noise between 800 and 1600 ISO would be negligible — certainly much less noticeable than the adverse effect on sharpness a much slower shutter speed would impose. If ever I’m shooting fast action such as this, and I have more than enough light to work with, I will use as fast a shutter speed as I can. While anything beyond say 1/3200th sec may seem superfluous, the ability for extremely fast shutter speeds to resolve amazing details during action sequences is unequivocal.
Calling back to Tip 1, you’ll notice how in efforts to showcase the amazing iridescence of this male Violet-green Swallow, I was diligent in aligning myself with the sun as to have my shadow pointing directly at the subject. While the light was harsher than I would generally like for most photography situations, the strong sun allowed the iridescence to pop, and facilitated the super fast shutter speed.
When working with a bird with such contrasting plumage in strong light, it was very important that I locked in my manual settings and kept my camera from deviating from this exact exposure. I highly encourage anyone that wants to learn more about this to read my blog post: The Limitations of Auto ISO for Wildlife Photography.
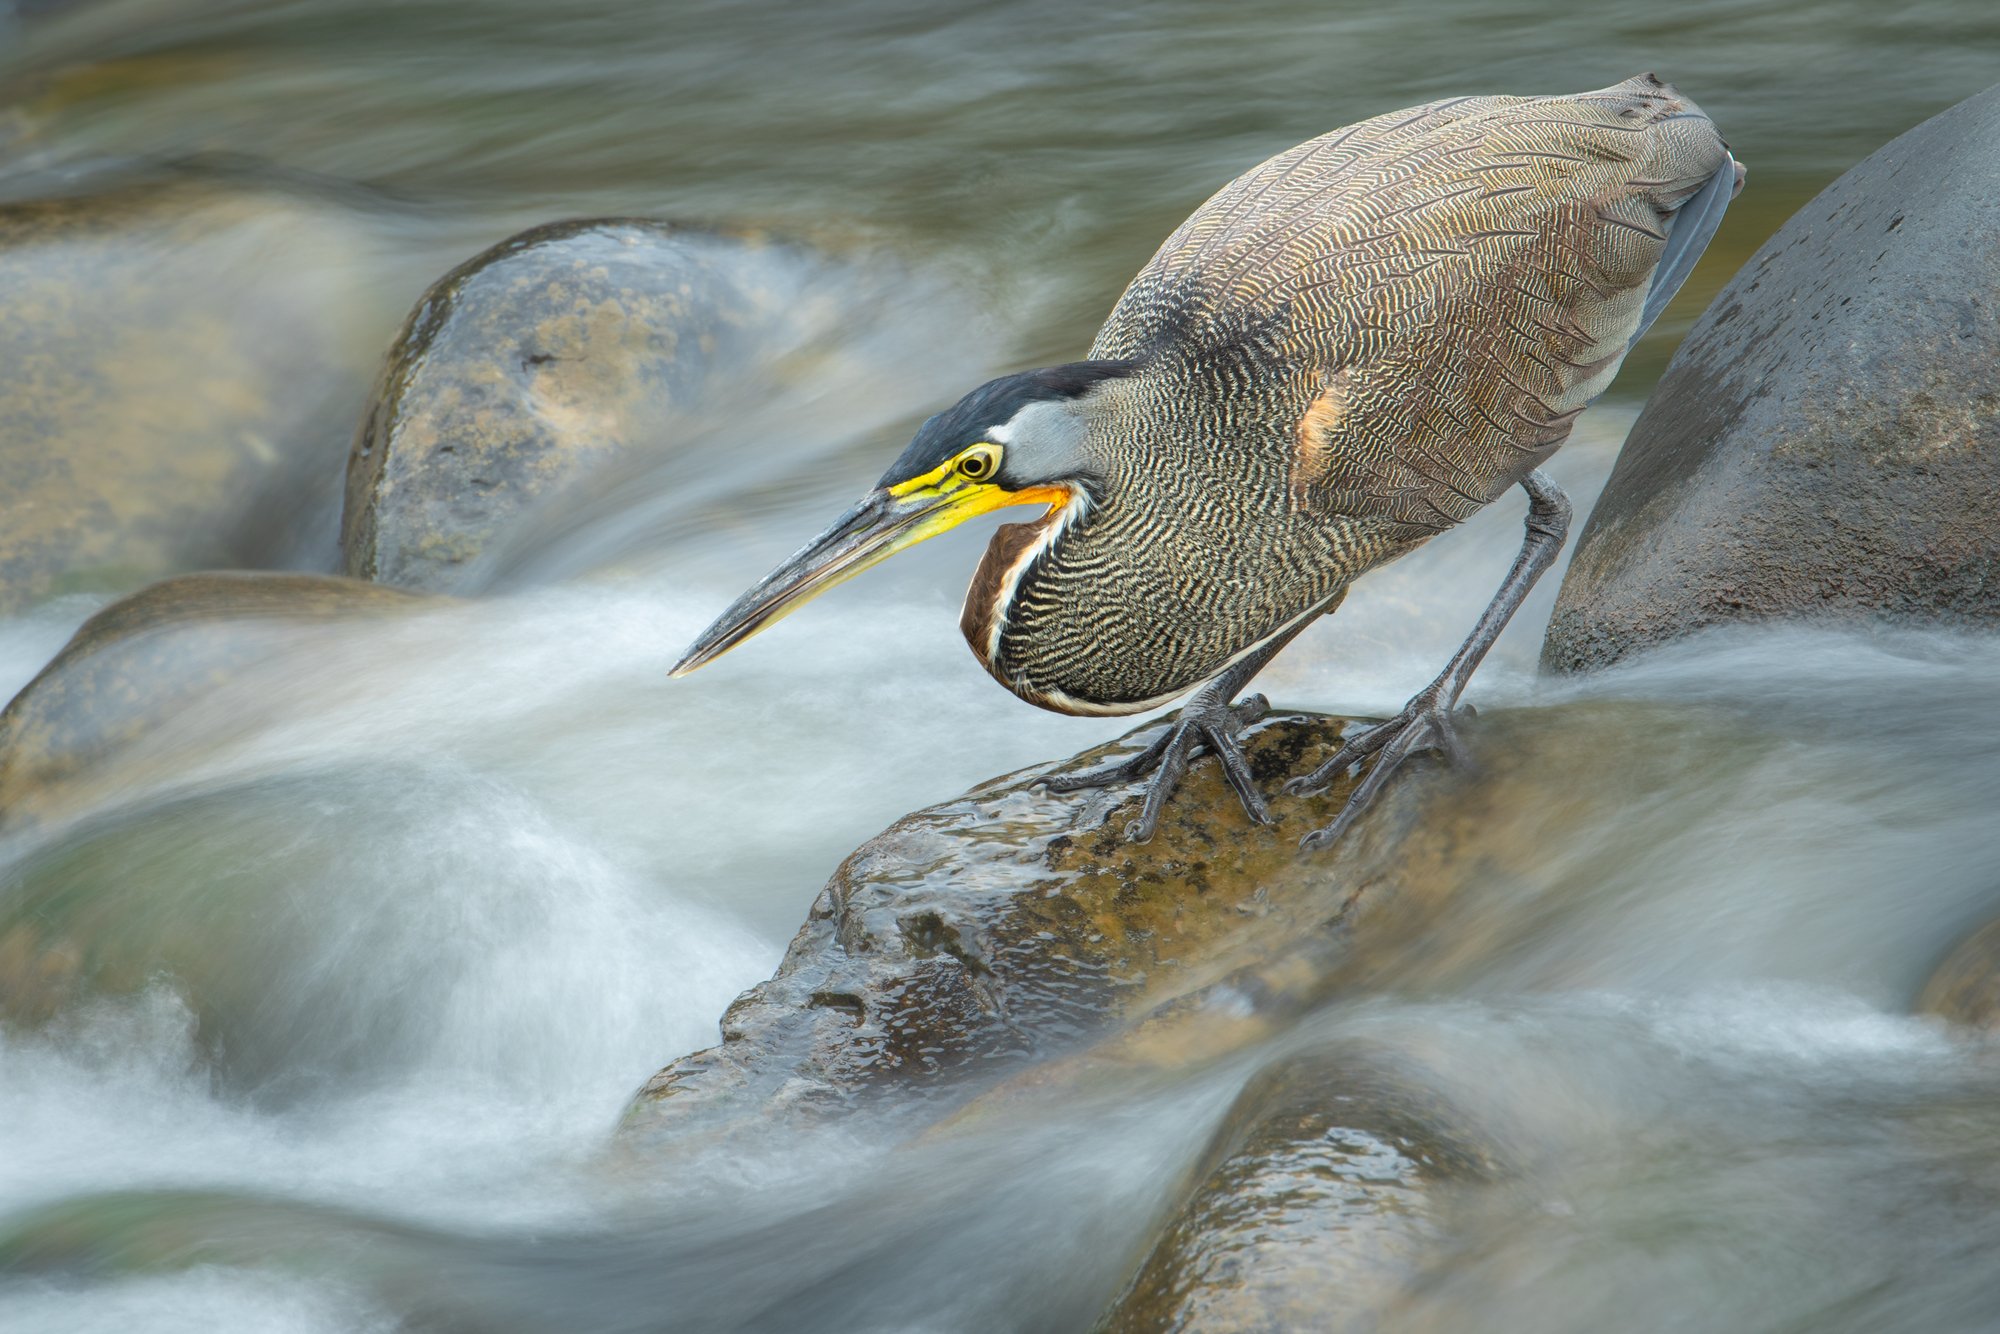
Bare-throated Tiger-Heron, Costa Rica
Canon 7D Mark II | Canon 500mm f/4 IS with 2x Teleconverter | 0.6 sec | f/16 | ISO 100
Being bold and intentional with my manual settings allowed me to come away from this shoot with a unique image that’s not only much more aesthetically pleasing than the results of a conventional approach, but it also better illustrates the bird’s behaviour. With a subject that offered up moments of complete stillness, and a dynamic surrounding, this was the perfect situation to experiment with slow shutter speeds — a fairly rare opportunity in the world of wildlife photography.
To strike a balance between showing motion in the water while still rendering the bird sharply, I decided upon a shutter speed of 0.6 sec. ISO 100 simply helped facilitate the use of such a slow shutter speed, and f/16 served a dual purpose in both decreasing the amount of available light (critical in achieving a slow shutter), plus increasing my depth of field on the surrounding rocks.
Photographing this scene close to sunset when the light was lower allowed me to use these settings without the need for a neutral density filter, and also removed the potential for specular highlights caused by sun reflections.

Red-and-green Macaw, Peru
Canon 7D Mark II | Canon 500mm f/4 IS with 1.4x Teleconverter | 1/40th sec | f/20 | ISO 100
With a cluttered background just beyond the subject — too close to be rendered smoothly out of focus, even with a wide open aperture — it was nearly impossible to come away with a pleasing flight image using conventional settings in this situation. My solution was to use the pan blur technique, which accomplished two things: firstly, the cluttered background was now smoothed out by the combination of slow shutter and horizontal camera motion. Additionally, by tracking as precisely as I could with the macaw, I was able to retain adequate sharpness on the subject itself. This effect gives the image implied motion and often a greater sense of dynamism when compared with the conventional approach.
Through some experimentation and previous attempts, I found 1/40th sec to be the sweet spot which allowed for adequate movement within the image, while still retaining some consistency of sharp results. Given I was photographing in fairly bright overcast light, I selected as low an ISO as possible, as to facilitate the use of such a slow shutter speed. Moreover, I was forced to stop down to f/20 to further diminish the light. While f/20 is not an aperture I would typically recommend using, given its negative impacts on overall image sharpness, the appeal of the intended image wasn’t meant to be critical sharpness in the first place, so that didn’t bother me. Besides, the smaller the aperture, the more textured the background would appear. While this is typically undesirable, in this case, the more textured the background became, the more it would accentuate the effects of the pan blur. Too shallow a depth of field, and the effects would barely be noticeable, meaning the slow shutter speed would provide zero aesthetic benefit.
3. Experiment with perspectives
Shifting one’s perspective, even just a tiny bit, can make all the difference in the world of wildlife photography. An eye level perspective can create an intimate feel that brings you into the animal’s world. Shooting something from above can highly a certain physical attribute, and provide a unique look.
One of the worst things we can do as photographers is simply default to photographing everything from our eye level. The odds that the optimal angle happens to be found at the easiest place to walk up and plunk your tripod down are very low. Walk up that hillside behind you and see if your perspective improves. Lay down and see what a low angle might look like. Shift your tripod the tiniest bit to one side or another, watching as highlights in your background come and go. I’m often asked about the clean backgrounds in my photos, and the assumption — even from other experienced photographers — is that it’s simply the result of heavy post processing. In reality, I don’t clone any distracting elements from my images. Instead, it’s the result of being very diligent about shifting my perspectives ever so slightly in the field, as to eliminate distracting elements from my frame.
Let’s explore these concepts with two very different images…

Pied-billed Grebe, British Columbia Interior, Canada
Grebe Canon 7D Mark II | Canon 500mm f/4 IS with 1.4x Teleconverter | 1/2500th | f/5.6 | ISO 1600
By submerging my tripod and positioning my lens just above the surface of the pond, I achieved an eye-level perspective of this Pied-billed Grebe as it began to dive. Shooting a subject that’s 10m away, 10cm high, from a camera that’s only 15cm high, results in a background several metres behind, and therefore beautifully out of focus. Compared with standing on shore, shooting that same subject from your standing eye level, the much steeper downward angle towards the bird results in a background that’s just a few centimetres beyond — meaning it’ll often be an in-focus mess of water ripples and distracting vegetation. Don’t worry, I saved you the trouble of doing all that trigonometry next time you set out to photograph water birds!
Remember, altering your perspective isn’t just about taking into consideration how your subject will appear. Perhaps more important yet, is how perspective will alter your background and foreground. The best photos are those where surroundings that strengthen the image intersect with a flattering angle of the main subject.
It can’t be forced, and often, there just isn’t an option. One of many reasons why this is such a challenging pursuit.

Golden Eagle, British Columbia Interior, Canada
Canon R5 | Canon 500mm f/4 with 1.4x Teleconverter | 1/3200th | f/5.6 | ISO 1600
The main motivation for this unique image was capturing the beautiful nape feathers of an adult Golden Eagle. The requirement to shoot from above meant I needed to find a very specific site. It’s important to remember that certain locations will lend themselves better than others to certain perspectives. Don’t get stuck on one idea or approach; instead, let the terrain and surroundings dictate what will work best.
4. WATCH FOR dynamic poses & Decisive Moments
Mountain Bluebird, Ultimate Loons Photo Workshop, British Columbia Interior, Canada
Canon R5 | Canon 500mm f/4 IS with 1.4x Teleconverter | 1/1250th | f/9 | ISO 500
The diagonal lines in this photo of a Mountain Bluebird break up the frame into several triangles, circulating the viewer’s eyes throughout. The bottom triangle acts as a guide up into the frame and towards the main point of interest. Remember that the direction of an animal’s or person’s gaze, while invisible, holds a lot of visual energy within a photo, and the viewer’s eyes will naturally follow that path as well.
The look back pose, and the resulting visual weight of the bird’s sight line helps to fill the empty space in the upper left portion of the image, and provides a counterpoint for the perch in the opposite corner.
One reason why “bird on a stick” images catch such a bad rap isn’t generally because of the bird, or even the stick, it’s the lack of a dynamic pose that doesn’t encourage visual flow within the image.
A few things to look out for…
OVER-THE-SHOULDER or LOOK-BACK POSES
These can help guide the viewer’s attention back into the image, rather than forcing it out toward’s the edge.
ENGAGING EYE CONTACT
For creatures with forward facing eyes, this can sometimes be best achieved with a fully direct look. For others, a head tilt anywhere between approximately 10-45° towards the camera from parallel can be enough to really connect with the viewer.
PEAK ACTION
By being present and observant, you stand a much better chance of capturing critical moments. Through careful observation, you may find that the behaviours of many species of wildlife have a predictable cadence, with “tells'“ that indicate the imminence of a particularly photogenic moment.
5. SEEK OUT natural framings
One of the most important skills you can look to develop as a wildlife photographer — or any photographer, for that matter —is how to organize multiple elements within a scene to create an engaging and cohesive image. This might seem like an extremely obvious or elementary point, but the reality is, for wildlife photographers shooting with a 600mm lens, the world is narrowed down to little more than a 3° field of view. Not only that, it also eliminates focus from all but a very narrow sliver of the scene. In short, by taking away much of what we see with our eyes, it generally simplifies a scene quite dramatically. As not to skip over the benefits of these exact points, this is what allows us to close in on distant subjects, and isolate them from what might otherwise be distracting surroundings. However, what I’ve found this often leads to for many photographers, is inexperience or disinterest with learning to organize more complex scenes. The result can sometimes be sterile photographs, lacking in much uniqueness or visual interest outside of their main subject; certainly not a problem for some species that deserve the spotlight, but for others, maybe not so much.
Wildlife are often found in complex environments, and even in the simplest of landscapes, the power of telephoto lenses can reveal a surprising amount of inconsistencies. While branches, boulders, tree trunks, and foliage can be lamented for cluttering up a scene, all the same, they can be embraced as potential artistic elements.
A great exercise I recommend to all wildlife photographers hoping to elevate their work, is occasionally photographing with a much shorter lens than you would typically use — it doesn’t even have to be your normal subject matter either. Suddenly seeing the world through a wider angle of view, without the crutch of the heavy compression of super-telephotos, can make things challenging, but often very beneficial. Upon switching back to longer focal length, you should find an improvement in your eye for balance within an image, and your ability to arrange elements in a more thoughtful way.
Something to be watchful for when you’re in the field that can help train your eye, are natural framings. Especially when confronted with a “messy” environment, a conscientious approach can create a sophisticated composition that communicates to the viewer that you approached the image with a lot of care and intent. From a more technical perspective, consider that when including additional elements of the scene to help frame the subject or guide the viewer’s eyes towards it, your choice of aperture will dictate the focus of those elements. Experimenting with your f-stop can help to further hone the image.

Great Horned Owl Nestlings, Birds of the Okanagan Photo Workshop, British Columbia, Canada
Canon R5 | Canon 500mm f/4 IS with 1.4x Teleconverter | 1/500th | f/5.6 | ISO 640
This moment was far from premeditated. In fact, I was quite surprised to come up over a rise to check on these fledglings, only to find them closer than anticipated, and sitting side-by-side like this. Realizing the potential for a nice environmental portrait, I gave them a wide berth, circling around until I found an angle that avoided undesirable overlap between birds, branches, and any distracting foreground or background elements. Fortuitously, the light angle happened to align very well from this same shooting perspective, providing nice catchlights from the filtered sun. This is the main reason that for many subjects, I often prefer to shoot in softer lighting conditions such as this. It gives you a greater tolerance to explore various angles that may help improve your composition, without being as tied to a very specific light angle.
If there’s one thing I can really emphasize about this post, it’s that in many cases, the difference between a mediocre image and an exceptional image, doesn’t result from one big dramatic shift. Instead, it’s an amalgam of little adjustments here and there. Think of it in the same way you’d approach post processing an image. You wouldn’t yank one or two sliders to + or - 100, you’d tinker away slowly with a few points here and there.
Individual adjustments that may seem inconsequential in the field, when combined, can produce an entirely different result than what you started with. A 20° shift to align more accurately with your intended lighting, lowering your tripod to achieve a more appealing angle, shifting your perspective a smidge to finesse your background, patiently waiting for just the right head angle to compliment the composition before moving on; all things worthy of forethought and experimentation.
Thanks very much for reading — I hope this has proven useful! If you have any thoughts, feel free to leave a comment below…